Sigma's monitoring function works in conjunction with a data logger and enables signal display,
threshold judgment, and saving acquired data.
There are two ways to use the monitoring function.
Each one requires a license to use.
Senspider is a multi-channel data logger that can work directly with Sigma
to display raw waveforms, FFTs, spectrograms in real time,
perform threshold judgement, and save data.
File monitoring
This function loads the text file continuously output by any data logger
and displays the raw waveform, threshold judgment result, and saves the data.
For details, please refer to File Monitoring.
Using Senspider
Preparation for using Senspider module
In order to use the Senspider module, you need to install additional components.
Please follow the steps below to install the additional components.
Make sure that you have installed Sigma version 1.18.0 or higher.
(To check the version, click the Info button
on the tool bar and select "Version")
Launch Sigma, click Info button and select "Activate Module".
Depending on the license information on the server, the Senspider module will be enabled.
(When using a USB dongle for authentication, this step is not necessary.)
Shut down Sigma
Download the installer of components "SigmaSSPModule-installer.exe" ,
double-click the installer and follow the instructions to install it.
In addition to the Senspider module, ".NET Framework" and "Visual C++ Runtime" will be installed if not already installed.
If the error "Cannot install because another installer is running" occurs
while installing ".NET Framework" or "Visual C++ Runtime",
it is probably due to a Windows update.
Cancel the installation, update Windows, and then try to install again.
Sigma 1.18.0 and above are not compatible with Senspider with previous firmware version.
If you use Senspider with previous firmware version , please download Sigma 1.17.3 from here★.
Basic operation
Click the Monitor button on the toolbar to open the monitoring window.
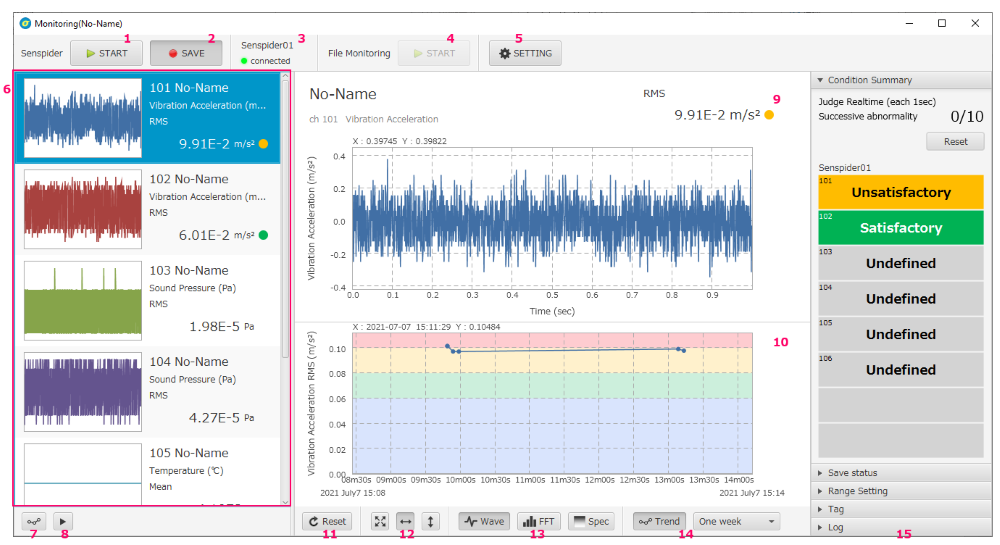
Monitoring Window
Monitoring start/stop button
When the button is pressed to ON, monitoring starts and the waveform is displayed in real time.
To stop, press the button again.
When the Senspider is set to use hardware trigger, turning the button ON will make the monitoring window wait for the trigger.
Save button
By monitoring with the Save button on, the record will be saved in Sigma.
Note that monitoring is not started just by pressing the Save button.
Senspider status indicator
One of the following status is displayed for each connected Senspider.
Not connected, Connected, Monitoring, Waiting trigger, and Saving.
File monitoring start/stop button
For more information about the file monitoring function, please refer to File Monitoring.
Setting button
Configure the basic settings for monitoring and alerts.
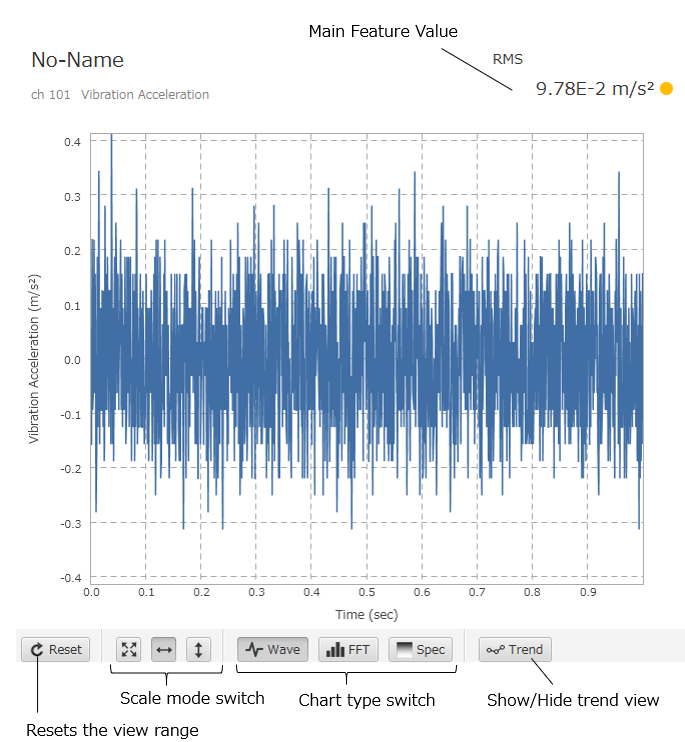
Thumbnail view
The most recent 1 second signal of each channel is displayed.
The one selected by button 14 among raw waveform, FFT, and spectrogram is displayed.
If button 7 is pressed, the trend of the main feature is displayed.
Display trends in thumbnail view
Switches the thumbnail view to the trend display of the main features.
For the conditions under which the trend is displayed, see Trend View.
Auto-scroll button
When turned on, each channel is selected in order at regular intervals and displayed in the Main chart view.
Main chart view
The signal for the most recent 1 second of the channel selected in the thumbnail view is displayed.
Trend view
When the Trend button (button 14) is pressed, the trend of the main feature of the channel selected in the thumbnail view is displayed.
For the conditions under which the trend is displayed, see Trend View.
Resetting the view range
Resets the view range of the Main chart view and Trend view.
If the channel has a view range setting, the range is reset to the set value.
Otherwise, the range is automatically determined based on the content.
Raw waveform, FFT, and spectrogram switching buttons
Trend view and period specification
When turned on, the trend of the main feature of the currently selected channel is displayed in the Trend view.
For the conditions under which the trend is displayed, see Trend view.
Shows the record saving status for each Senspider.
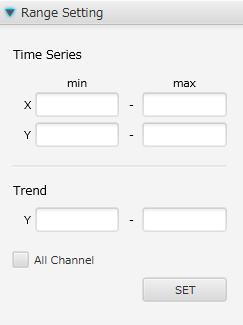
View range setting
Set the view range of the chart for the currently selected channel or all channels.
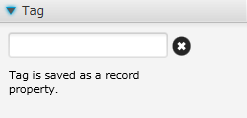
Tag
Set a text for identification to the record to be saved.
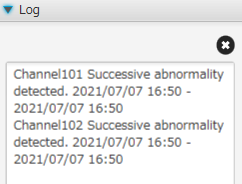
Log
Shows the alert logs based on threshold judgements and alert settings.
Monitoring and saving records
Start and stop monitoring
Each time pressing the START button , monitoring is toggled ON and OFF.
When it is turned ON, Senspider data acquisition starts and real-time signal is displayed in the main chart view.
Saving records
When monitoring is performed with the SAVE button ON,
the acquired data is saved as records in Sigma.
Start monitoring by Senspider's trigger
When the START button is turned on, the monitoring window will be waiting for the trigger.
When the Senspider starts logging in this state, it will enter the monitoring state and real-time signals will be displayed in the signal view.
If the START button is not pressed, no data will be sent to Sigma even if logging is started by Senspider.
Start saving data by Senspider's trigger
By turning on both the START and SAVE buttons,
when the Senspider starts logging, the real-time signal will be displayed in the signal view and the data will be saved.
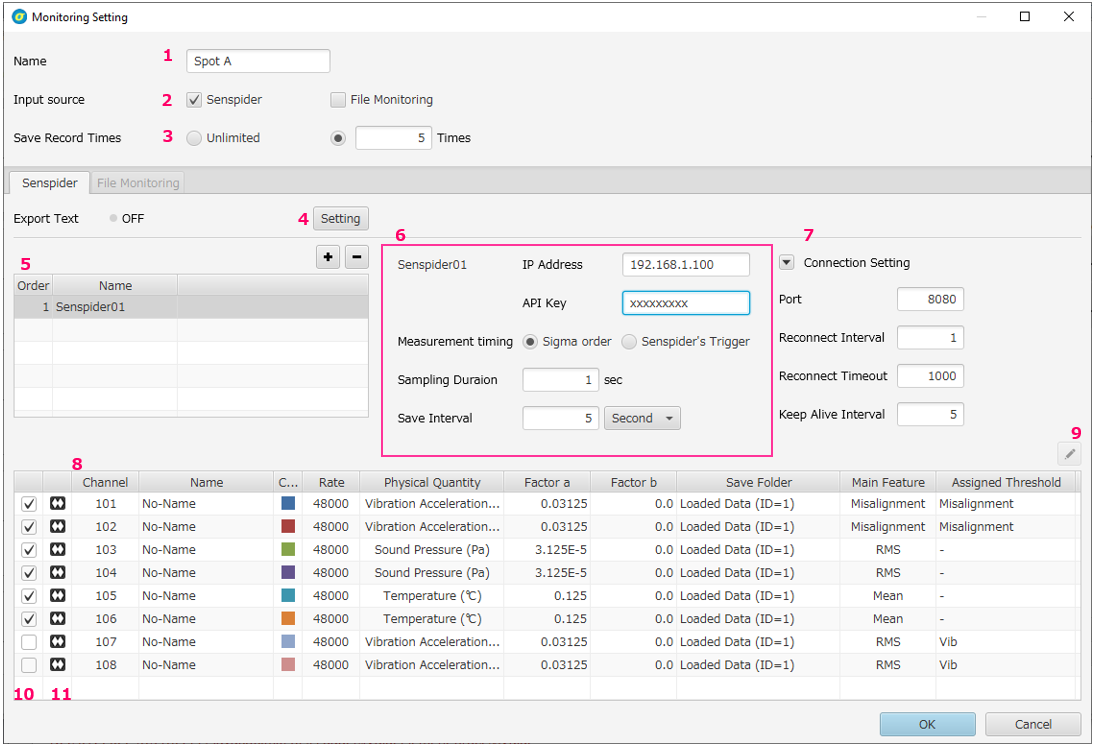
Basic settings
To configure the basic settings,
press the SETTING button and select "Basic settings" to open the Monitoring settings list window.
Add/Edit/Delete settings
Create, edit, or delete a monitoring settings.
Monitoring setttings list
Displays the list of monitoring settings that have been created. (Up to 20 settings)
The settings marked with a green circle is the settings that is currently in use.
The settings currently selected in the list will be loaded in the monitoring window.
Click the Add or Edit button to open the Monitoring settings edit window.
General Settings
Name : Any name
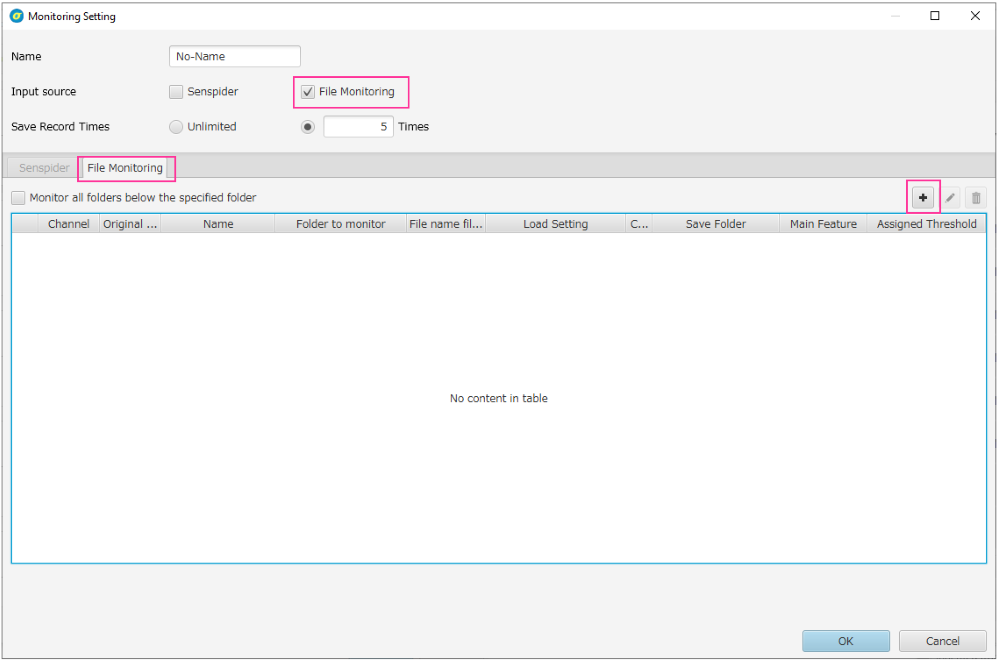
Input source
Check "Senspider" if using Senspider or "File" if using file monitoring.
Both of them can be used together.
Checking "File Monitoring" will enable you to select the File Monitoring tab and configure related settings.
See File monitoring for details.
Record save count
Data saving will be automatically stopped when the number of times saved reaches the specified number.
Text export
When saving data, the data is always saved in Sigma in binary format,
but you can optionally export the feature values, judgment results, raw waveforms, and FFT as a CSV format text file.
For details, please refer to Text export.
Senspider setting table
Set the name and port of the Senspider to be connected.
Each item can be changed directly by clicking in the table.
To add a Senspider to the table, click the Add button.
To remove a Senspider from the table, click the Remove button.
Up to 5 Senspiders can be added in the lisrt,
but the actual number of Senspiders that can be processed depends on the specs of the PC.
Recording Settings
Recording settings for the Senspider selected in the Senspider table.
IP Address:Senspider's IP address
API Key:Senspider's API Key (Please find in the web console of the Senspider)
Measurement timing: Specify whether logging is performed at regular intervals from Sigma or triggered by Senspider.
Sampling duration:Duration of one record when saving data.
Save interval : Saving interval when saving data. In the above example, data for 2 seconds is saved once every 5 seconds.
If you want to save the data continuously, set the sampling time and saving interval to the same value.
When using Senspider's triggers, the save interval cannot be specified and will always be set to continuous recording.
Connection settings
Settings related to connection with Senspider.
Normally, you don't need to change these settings. Please refer to the Senspider manual for details.
Channel setting table
The list of channels associated with the Senspider selected in the Senspider setting table is displayed.
By double-clicking any line, the setting window of each channel will be opened.
Edit channel setting button
Select any row (channel) in the channel setting table, and click the Edit button
to open the channel settings window.
If you select multiple channels and click the button, you can edit multiple channels at once.
Check box to activate the channel.
The use or disuse of a channel can be changed directly with a checkbox in the table.
If the settings are to save the raw waveform when saving the record,
the raw waveform icon will be displayed.
If the raw waveform is not saved, only the calculated features will be saved in the record.
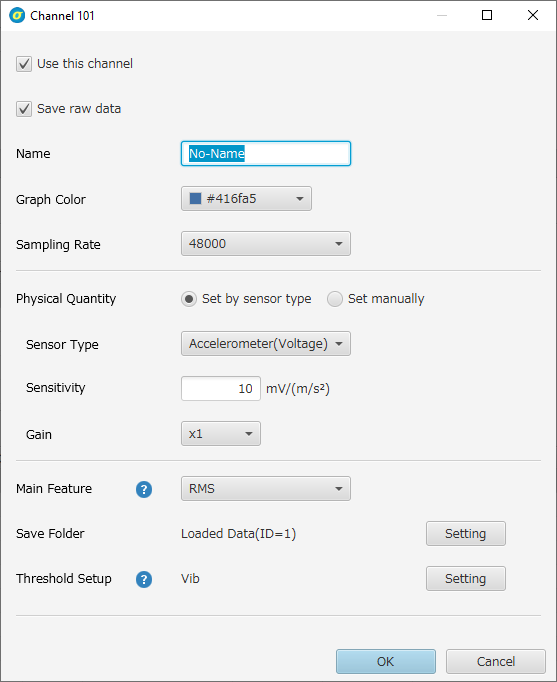
Channel settings
Channel settings window
Name:Any
Graph color:Color of the line used to draw the signal
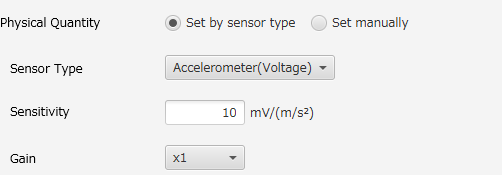
Conversion to physical quantity
The settings to convert the numerical value of the input data from Senspider to physical quantity in Sigma.
You can select from the following two methods.
Set by Senspider compatible sensor type
You can configure the settings by simply selecting the sensor type and the minimum information required.
This method is usually recommended. The sensor types are as follows
Vibration accelerometer (voltage output)
By selecting the sensitivity of the vibration accelerometer mV/(m/s2) and the gain setting of Senspider,
the appropriate conversion factor will be set.
Thermometer (°C) / Thermometer (°F)
The appropriate conversion factor will be set without specific setting.
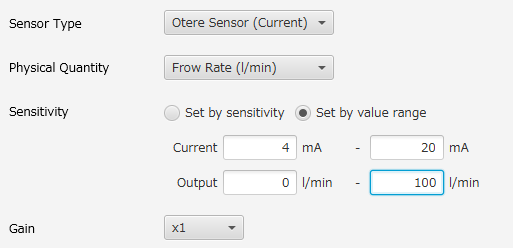
General-purpose sensor (voltage mode / current mode)
By setting the physical quantity and the sensitivity of the sensor,
the appropriate conversion factor will be set.
The following two methods are available for specifying the sensitivity.
When there is an offset in the output current/voltage,
such as in the case of a sensor with 4-20mA output, use "Specify by corresponding numerical range"
Specify by sensitivity: Enter the sensitivity of the sensor (value of current/voltage per unit physical quantity).
Specify by corresponding numerical range: Enter the range of current/voltage output by the sensor and the range of the corresponding physical quantity.
Example of setting for a pressure gauge with 4-20 mA corresponding to the pressure of 0-2 MPa
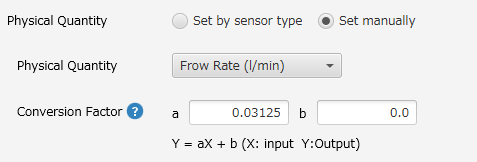
Directly input the conversion factor
Set the values of 'a' and 'b' in Y = aX + b, where X is the value of the raw data in Senspider, and Y is the physical quantity in Sigma.
To set them correctly, you need to understand the interface card used in Senspider, sensor sensitivity, 16bit integer range, gain, etc.
Normally, there is no need to set it in this way.
Main fearue
A feature used for displaying numerical values in thumbnail view, signal view, and for threshold judgment.
In addition to the preset features, user-defined features registered as record property can also be selected.
Save folder
A folder in Sigma where records are saved.
Threshold setting
Among the threshold settings applied to the save folder,
those whose target physical quantity/feature matches the physical quantity/main feature of this channel will be applied.
Click the "Set" button to assign a threshold setting to the currently selected save folder.
For more information about threshold settings, please refer to Threshold.
Graph view
Signal view
During monitoring, the signal view shows the latest 1 second of data for the selected channel, refreshed constantly.
Note that the view shows the data of the latest 1 second regardless of the sampling duration.
Operations such as scaling and panning are the same as normal signal view operations.
See Signal view operations for details.
Trend view
When the Trend button is turned on, the trend of the main feature of the channel is displayed below the signal view.
Conditions to show trend
The trend is drawn using the feature values of the records stored in Sigma.
Therefore, a trend will not be displayed if no data is saved.
Among the records stored in the save folder of the channel,
those that satisfy all of the following conditions are used for the trend.
The channel matches.
The physical quantity matches.
The main feature has been calculated.
Threshold and judgment result
You can apply a threshold to the features calculated during monitoring and display the result.
Threshold is set for each folder in Sigma. (see Threshold for more details).
If a valid threshold setting is assigned to the save folder of the channel,
the result will be displayed in Thumbnail View, Signal View, and Status Summary of Property View,
and the threshold setting will be reflected in the background color of Trend View.
Example of Judgment Result
The results shown in the thumbnail view and the main chart view with colored circles (1 and 2 in the figure)
are real-time results based on the last one second of data.
On the other hand, the judgment results shown in the Status Summary (3 in the figure) are the results
for each "threshold judgment timing" specified in the "Alert Settings".
Alerts are fired based on the judgment results shown in the Status Summary.
For details on the alert function, please refer to Alert.
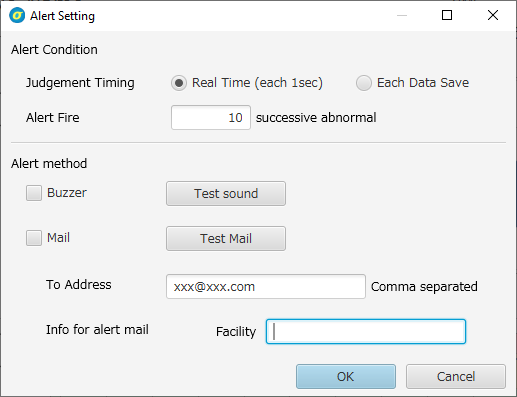
Alert
Based on the result of threshold judgment,
alerts can be fired by e-mail or alarm sound.
To set up alerts, press the SETTING button on the monitoring screen and select "Alert Settings".
The alert setting is the global setting that is used in all monitoring settings.
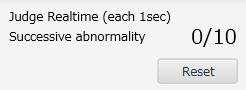
Threshold judgment timing
Select the threshold judgment timing from real time (every 1 second) or each data save.
If you select "each data save",
the threshold judgement will be determined by calculating the feature value
using the data for the sampling duration at each save interval specified in the monitoring settings.
In this case, please note that no judgment will be made if the record is not saved (SAVE button is not pressed).
The judgment results for each threshold judgment timing will be displayed in the status summary,
and the alerts will be fired based on the results.
The judgment results displayed as colored circles in the thumbnail view and the main chart view
are always real-time (last 1 second) judgment results, and will not be used to trigger an alert.
Conditions for firing alerts
An alert is fired when the threshold judgment results are 'Unacceptable' for a specified number of times in a row for a channel.
Alerting method
An alert will be fired according to the method checked.
It is also possible to use both alert sounds and e-mails.
With each test button, you can sound a test alert or send a test e-mail.
To send a test email, enter the email address in the notification address field beforehand.
Behavior when alerts fired
When a continuous 'Unacceptable' results are detected on any channel,
an alert is fired, and the upper part of the status summary blinks in red.
If the alert sound is used, the alert sound will continue to sound.
If email notification is used, an email will be sent when the alert is fired.
To cancel the alert status, press the reset button.
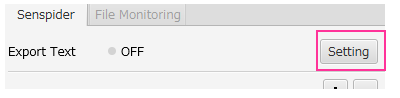
Text export
At the same time as saving the records in Sigma at the save interval specified in the monitoring settings,
various text files can be exported. To configure the text export settings,
click the Text Export Settings button.
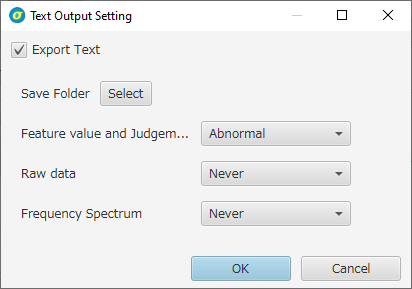
Text export setting
Text export check box: Set whether to exoprt text or not.
Save folder :
Specify the destination folder for eport.
Within the specified folder, a folder for each Senspider and subfolders for each type of text file will be automatically created, and the text files will be exported to them.
The three types of text files are as follows, and each text file contains data for all channels in use.
Main features and Judgment results : Outputs the value of main feature of each channel and the judgment results if thresholds are applied.
Raw waveform data: Outputs the raw waveform data of each channel.
Frequency spectrum data : Outputs the frequency spectrum data of each channel.
The folder name for each Senspider is "ssp0" for the first unit, "ssp1" for the second unit, and so on.
Subfolder names and file names for each text file type are shown below.
The file name consists of the date and time of measurement and a string indicating the text file type (stat, raw, fft).
Subfolder name
File name(ex.)
Main features and Judgment results
stat
2019_09_09_16_45_30_stat.csv
Raw waveform data
raw
2019_09_09_16_45_30_raw.csv
Frequency spectrum data
fft
2019_09_09_16_45_30_fft.csv
For each type of text, you can specify the conditions for export. The following four conditions can be selected.
Always
When threshold judgment result is 'Unsatisfactory' or 'Unacceptable'
When threshold judgment result is 'Unacceptable'
Never
In the case of condition 2 or 3, the text file will be exported when one of the channels to which the threshold is assigned meets the condition.
Other functions
View range setting
To specify the view range by numerical value, enter values in the view range settings
in the property view and press the SET button.
If the "Common to all channels" checkbox is checked , the view range will be applied to all channels.
Tag settings
When a record is saved with a string entered in the tag form in the property view,
the entered string will be stored as the tag for that record.
Log view
The log of fired alert is displayed.
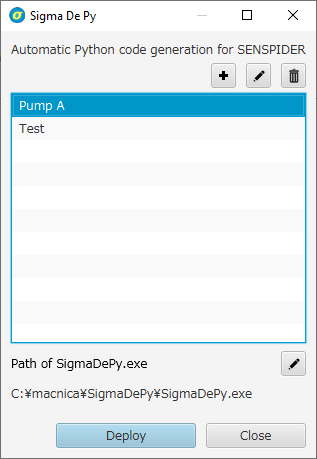
Sigma De Py (Deployment of features to Senspider)
"Sigma De Py" is a function that converts the feature and threshold definitions defined in Sigma into Python code
that can be executed in Senspider.
To use this function, you need to install MACNICA Inc.'s "Sigma De Py application", which can be downloaded from the following URL.
https://macnicahq.app.box.com/s/0g4nwp5y67k9buyrn4i5yiyf9p9jm3k8
Create a Sigma De Py settings in Sigma. (See Sigma De Py setting for details.
Deploy to Senspider using the setting.
Please refer to the Senspider manual for the necessary settings on the Senspider side.
After deployment, the connection between Sigma and Senspider is not required.
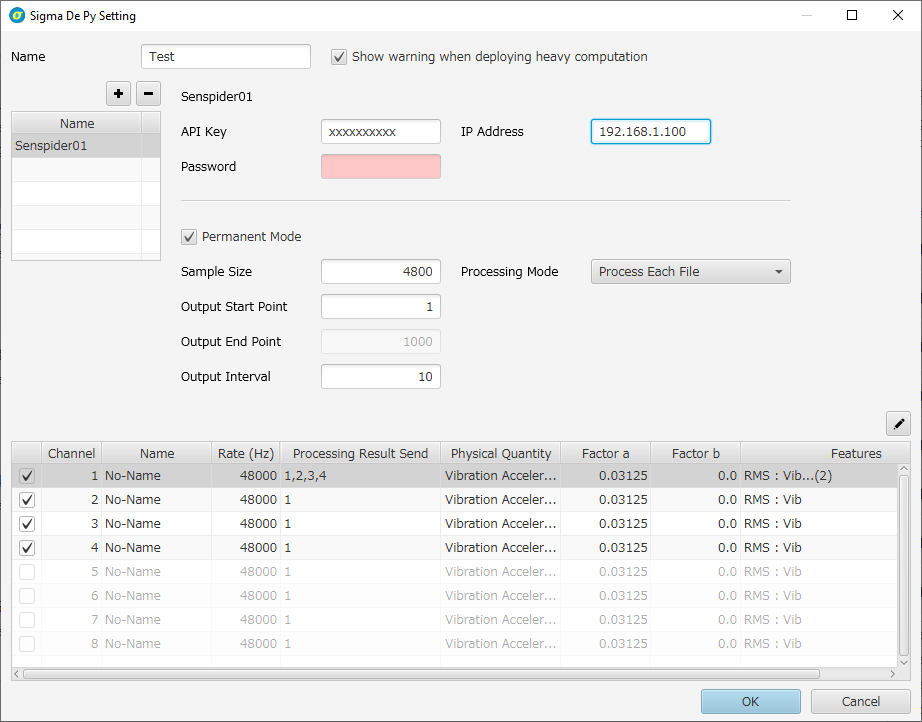
Sigma De Py setting
To create or edit settings of Sigma De Py, click the Setting button on the monitoring screen and select "Sigma De Py setting".
Sigma De Py settings list
Add setting button
Adds a Sigma De Py setting. There are two ways to add a setting.
Create New
A setting will be created with the general default values entered.
Create from a monitoring setting
A setting will be created with the values from the specified monitoring setting.
Once created, the original monitoring setting and the created Sigma De Py setting are independent
and do not affect each other in any way.
Edit setting button
Edits the selected setting. You can also open the edit window by double-clicking on any item in the settings list.
Delete setting button : Deletes the selected setting.
Settings List : Up to 20 settings can be defined.
Button to set the SigmaDePy.exe location.
Deploy button :
Using the selected setting, convert the definitions of features and thresholds to python codes, and deploy to Senspider.
Editing Sigma De Py setting
In the Sigma De Py settings list window,
click the Add or Edit button to open the Sigma De Py Setting Edit window.
Name : Any name
Check box for whethrer to show a warning message when computation load is high.
If the checkbox is checked (default), when the computation load in Senspider is judged to be high
during deployment, a confirmation dialog will be displayed asking whether to execute the deployment or not.
The computation load depends on the number of channels used, the number of features, and the definition of features.
Senspider List
Deployment settings for multiple Senspiders can be defined within one Sigma De Py setting.
Senspider Setting
API Key:Enter the API key of the Senspider. (You can check it in Senspider's web console.)
IP address:Enter the IP address of the Senspider.
Password:Enter the password of the Senspider.
Processing settings
All of the following items must be the same as the values set in Senspider.
Number of data per file: Number of samples in one file.
File output start position:
Specify from how many files after Senspider starts capturing, the feature calculation process will start.
File output end position:
Specify the number of files after Senspider starts capturing to end the feature calculation process.
If you do not specify the end, check "Persistent mode".
File output interval: Specify the interval to output files for feature calculation in Senspider.
The unit is "file", and the evaluation will be performed with an interval of the specified number of files.
To evaluate continuously, set 0.
Processing Mode: Select whether to process per file or batch processing at the end of capture.
Channel list table
Shows the settings of each channel of the Senspider selected in the Senspider List Table.
Only the checked channels will be used.
The checkboxes can be changed directly by clicking them.
To edit the settings of each channel, double-click on the row of the channel,
or click the Edit button with the channel row(s) selected.
If you click the Edit button with multiple channels selected, you will be in batch editing mode for multiple channels.
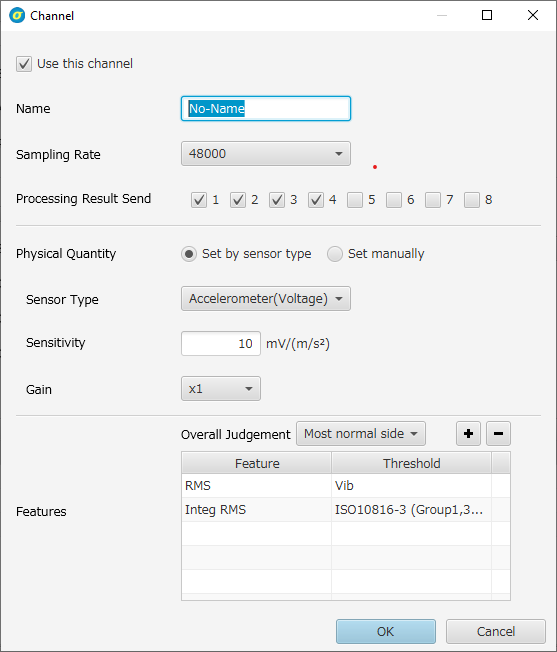
Edit Channel Settings
Check box to specify whether or not to use this channel
Name: Arbitrary name for the channel
Sampling rate
Processing result destination number
Conversion to physical quantity
Settings to convert the raw values acquired by Senspider to physical quantities.
As this is the same as the one in Monitoring Settings,
please refer to Channel Settings of Monitoring Settings for details.
Feature Value and Threshold
Overall judgment method
Specifies the overall judgment method to be used when multiple feature values and thresholds are set.
It is possible to select whether to use the most normal or the most abnormal of the judgment results for each feature value.
Feature Value and Threshold Table
Multiple combinations of feature values and thresholds to be calculated by this channel can be defined.
You can add settings by clicking the Add Settings button,
and then select the feature values and thresholds by clicking each item in the table.
You can select not only preset features, but also user-defined features. (The same goes for thresholds)
Thresholds are defined for a specific combination of physical quantity and feature,
so the selectable thresholds are limited to those that match the combination of physical quantity set in the channel and the target feature.
File Monitoring
File monitoring is a function that allows Sigma to continuously load, display, and save the text files output by any data logger or other device.
Preparation for using the file monitoring module
To use file monitoring, a license that supports the file monitoring module is required.
If you have a license for the file monitoring module, you can use the file monitoring function by the following operations.
Click Info button and select "Activate Module".
Depending on the license information on the server, the file monitoring module will be enabled. (If you are using a USB dongle, this action is not required.)
How to set up
Click the Monitor button on the tool bar to open the monitoring window.
Since the monitoring window is common to the Senspider module, please refer to Basic Opearation for details on the window functions.
File Monitoring Settings
To perform file monitoring, you must first create a monitoring setting for file monitoring.
To create a setting, press the SETTING button to open the Monitoring Setting List window, and then press the Add New Setting button .
Check "File" as the input source.
Select the File Monitoring tab and press the Add File Monitoring Channel button
to open the Add File Monitoring Channel Window.
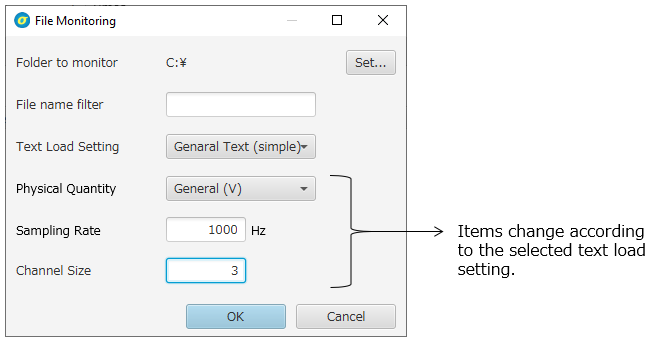
Folder to monitor
Text files newly output to the folder specified here will be loaded into Sigma.
If you want to target all folders below the specified folder,
turn on the "Monitor all folders below the specified folder" checkbox.
File Name Filter
Among the files output to the folder to monitor, only the files that contain the specified string in the file name will be loaded.
If left blank, all files newly output to the folder will be loaded.
Text loading setting
Specify how to load text files.
You can choose from "General Text Format (Simple)" or custom load settings you defined.
The sampling rate, physical quantities and conversion factors for each channel are determined by the load settings specified here.
For more information on text load setting and how to create custom load settings, see General Text Data Loading.
Physical quantity and sampling rate
If you select "General Text Format (Simple)", you will need to specify the physical quantity and sampling rate here.
If you select "Custom settings", the physical quantity and sampling rate in the settings will be used.
Number of channels
If you have selected "General Text Format (Simple)" or "Custom Setting with 'All Channels' ON",
you need to specify here how many channels you want to load.
If you select "Custom settings with 'Individual channels' ON", the number of channels will be determined automatically from the settings.
Press OK to add file monitoring channels for the number of channels to be loaded.
As with the Senspider channel, each file monitoring channel can be individually specified for
"Main Feature", "Save Folder", "Drawing Color", etc.
To edit these items, double-click on any file monitoring channel, or click the Edit button with any file monitoring channel selected to open the channel setting window.
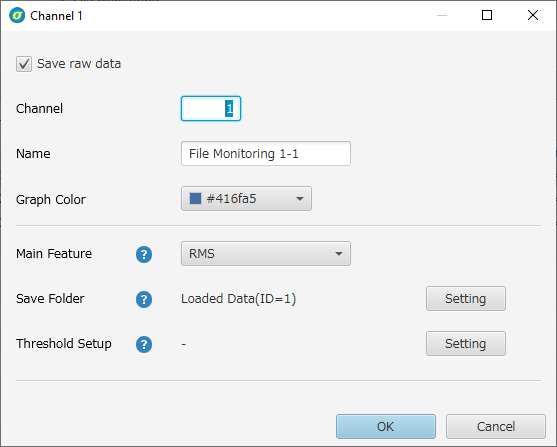
Channel: The value of the channel displayed in monitoring window and saved as a property of a record in Sigma.
It can be different from the original channel (column position in the text file).
Name: Used only for display in the monitoring window.
Graph color: The color of the line used to draw the signal.
Save Folder : The folder in Sigma where the records are saved.
Main Feature:
A feature used for thumbnail view, display in signal view, and threshold judgment.
In addition to the preset features, user-defined features can also be selected.
Note that only user-defined features that are registered as record property can be selected.
Unlike the Senspider channel settings, the physical quantities and conversion factors are determined by the text load settings,
and cannot be changed here. If you want to change these items, delete the added file monitoring channel with the Delete button , add the file monitoring channel again, and select the appropriate load setting.
If you want to add a different folder to monitor, or apply different load setting to the same folder depending on the file name,
click the Add File Monitoring Channel button again to add file monitoring channels.
You cannot add a file monitoring channel that has the same combination of folder to monitor and a file name filter as an already registered channels.
The following figure shows an example of adding file monitoring channels three times, and the relationship between each channel and the file to be loaded.
Start and stop file monitoring
To start file monitoring, turn on the File Monitoring Start button.
During file monitoring, if a new file is created in the monitoring folder,
the file will be loaded according to the settings, and the signal will be displayed in the thumbnail view and the main chart view,
as well as the calculation result of the main feature and the judgment result if the valid threshold is set.
The loaded data is always saved as a record in Sigma.
The thresholds to be applied and the conditions under which the trend is displayed are the same as for Senspider channels.
For details, please refer to Graph View, Threshold and Judgment Result.
File monitoring is stopped when the Start File Monitoring button is set to OFF.
 on the tool bar and select "Version")
 on the toolbar to open the monitoring window.
 , monitoring is toggled ON and OFF.
When it is turned ON, Senspider data acquisition starts and real-time signal is displayed in the main chart view.
, monitoring is toggled ON and OFF.
When it is turned ON, Senspider data acquisition starts and real-time signal is displayed in the main chart view.
 ON,
the acquired data is saved as records in Sigma.
ON,
the acquired data is saved as records in Sigma.
 and select "Basic settings" to open the Monitoring settings list window.

 .
To remove a Senspider from the table, click the Remove button
.
To remove a Senspider from the table, click the Remove button .
.
 to open the channel settings window.
If you select multiple channels and click the button, you can edit multiple channels at once.
to open the channel settings window.
If you select multiple channels and click the button, you can edit multiple channels at once.

 , add the file monitoring channel again, and select the appropriate load setting.

